
We all know that content is king of inbound... but what is queen?
While there are several compelling suggestions that could be given in answer to this question (including storytelling, email, social media... the list goes on!), our years of experience and our expertise in the inbound marketing world brings us to one particularly empowering option: SEO.
After all, how can content, as king, be expected to take the throne of your inbound marketing strategy when it doesn’t have SEO, it’s queen, to ensure that it reaches the top of search engine page results (SERPs) and gets seen by prospective business clients?
In this guide, we have broken down our nine content optimisation best practices you should implement each time you create a new piece of content for your website, in addition to revisiting and updating older content – whether that’s on your blogs, pillar pages, downloadable content, or any other piece of inbound writing that you share on your website.
9 content optimisation best practices to start implementing immediately:
1. Use heading tags appropriately (H1, H2, H3 etc.)
Using different headings is a fantastic way of breaking up your content into a readable, easy-on-the-eye structure. What’s more, it helps readers to understand the overall structure of your content or webpage, and helps to optimise it for Google Snippets!
A common mistake is to choose header tags based on their size, rather than what they should actually be used for. If you feel your heading tags make the text look too big or too small, be sure to amend this in your CSS! For example, here at Angelfish, our H2s are 35px and our H3s are 21px.
Here’s how to make use of header tags in your content:
- Heading 1 (H1) should be used only once, for the main heading of your content (such as a blog title).
- Heading 2 (H2) should be used for subheadings throughout your content.
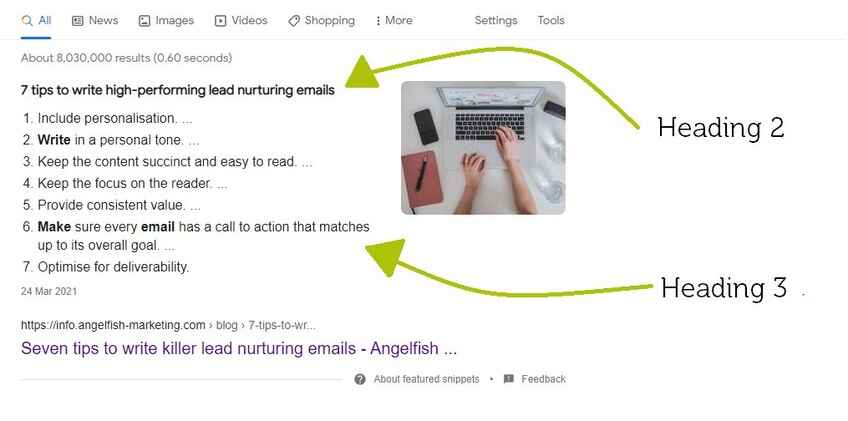
- Heading 3 (H3) should be used for numbered lists in order to optimise for Google Snippets.
- Heading 4 (H4) should be used if you need to break down the content under H3s further.
Here’s an example of how a blog appropriately optimised with header tags will appear in Google Snippets (you can read the full blog here to see how the headers look):
Additional resources:
- Do I need to be an SEO expert to rank on Google?
- On-page SEO solutions: 5 tactics to rank your site faster
2. Maximise your use of keywords
As we’ve mentioned in many previous blogs, keywords and keyword research are critical to the success of your content. This is because they are essentially the terms your prospective clients will be using to find your products and services – so, it’s vital that you make the best use of them!
For maximum impact, include keywords that are (preferably) of high search volume and low competitive difficulty, and that are relevant to both the content and your business goals in the:
- title where possible (within the character count and ensuring the title still makes sense)
- meta description of the page
- page title
- alt text of any images you use
- first 100 words of your content, and twice more throughout
Additional resources:
- What are keywords & how do they impact your inbound marketing?
- Why you need to nail your keyword research for your SEO
- How to Approach Keyword Research for Inbound Marketing

3. Write an effective page title tag
Not to be confused with the title of your content, this is the large text that typically appears in Google search results under the page link:

To optimise this appropriately, you should:
- ensure this is no longer than the recommended 70 characters
- include the keyword
- include your company name at the end
- use dividers to split the elements up clearly
It's worth noting that Google is now revising title tags, so what you write here may not necessarily be seen as the page title in SERPs. However, it's still important to follow this formula so that readers and search engines still know what your content is all about!
Additional resources:
- 12 fatal SEO mistakes and how to avoid them
- Top five factors Google uses to decide where to rank your website
4. Include a strong meta description
In a nutshell, a meta description is a sentence or two that briefly describes a web page’s content, and is the first section of text usually visible under the page title in Google search results:

In order to write these effectively, you should:
- ensure that it fits within the recommended 150-155 character count
- include your chosen keyword
- incorporate a call to action (e.g., “read the blog now” or “discover how to optimise your content”)
Additional resources:

5. Assign a relevant topic and pillar page
As explained in one of our previous blogs, a pillar page is the main hub of information relating to a specific topic on your website. This page should link out to other content on your website related to that topic – and to optimise that content, it should also link back to the pillar page.
As an example, Content Marketing is one of the pillar pages on the Angelfish Marketing website, and this links out to several of our blogs that fall under the assigned topic of Content Marketing. In turn, these blogs link back to the Content Marketing pillar page.
This enables Google and other search engines to recognise your pillar page as an authority on a particular topic, and a source of additional, more in-depth information on that topic.
Therefore, it’s important that you assign a relevant topic and pillar page to each piece of content you write for powerful content optimisation! To do this:
- link your blog to the relevant pillar page at least three times throughout
- assign your blog to the relevant topic (in HubSpot, this can be done under the “optimisation” tab)
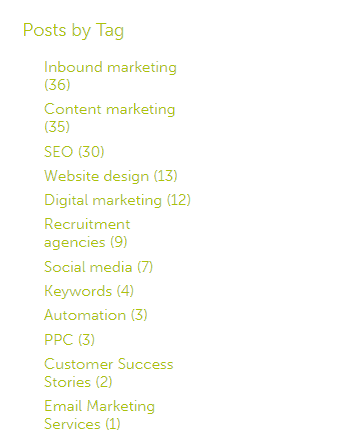
- tag your blog with the relevant topic (one tag per blog only) so that website visitors can filter your blog page down to the topics they want to read about (see opposite for an example from the Angelfish blog)
Additional resources:
6. Include both internal and external links
Internal links
As well as linking to a relevant pillar page in your blog content, you should also include at least five more links to other internal pages and content to help Google understand the hierarchy and structure of your website.
For example, throughout this guide, we have shared a number of other relevant links that will take you across the Angelfish website!
External links
Similarly to internal links, external (or outbound) links to sites with a good domain authority can provide additional context to your content for Google. They will also help you to build your readers’ trust and demonstrate that you have done current research around your topic!
For accessibility purposes, ensure that any link text is meaningful, and describes the content of your link target. For example:
![]() Don't write this...
Don't write this...
Click here to read our inbound marketing blog
![]() Do write this instead...
Do write this instead...
Read our inbound marketing blog to learn more
Additional resources:
7. Include images with alt text
Images are not only a great way to illustrate and emphasise the written aspects of your content, but can also help to break up the text further for your website visitors for more comfortable reading.
Ensure that:
- any images you use are relevant to the content, as well as reflective of your brand
- your content has one featured image (these usually appear in blog previews and/or at the top of your blog), and at least two other relevant images evenly dispersed throughout
- each image is accompanied by alt text for accessibility purposes. This text should describe what the image is of and include the keyword.
- you have permission to use those images!
Additional resources:
8. Include a compelling call to action (CTA)
Completing the perfect content optimisation will be all for nothing without a relevant, enticing CTA to finish. After all, that’s where you’ll be converting leads into customers once they’ve read your content!
We have further guidance on how to create effective CTAs in this blog, but in a quick summary:
- On website and pillar pages, you should include a number of CTA buttons with short, snappy text that begins with a verb. For example, “Get your free download” or “Read the blog here.”


- For a blog, you should include one call to action at the very end, preceded by relevant “warm-up” text, and preferably in an eye-catching banner design with minimal, but powerful text. Be sure to add alt text to this as well for accessibility!

Additional resources:
9. Additional content optimisation and accessibility to-dos
There are a final few things that you should check off your list before setting your content live that will ensure your optimisation is complete and the best it can be:
- Ensure your blog content is no less than 600 words. We usually aim for a maximum of 800, although sometimes the subject matter may call for a longer article.
Essentially, you want your content to be long enough to demonstrate your expertise, but not so long that it becomes off-putting in our current climate of shortened attention spans – the longer you can keep visitors on your webpage, the better this will be for SEO! - Keep paragraphs to a maximum of three lines each for “snackability.”
- Where possible, enrich your content with other relevant key search terms.
- For blogs, have the publish date on display and a relevant member of staff as the author of the piece. If you update the blog, ensure you add a note at the top to say when the piece was updated.
- Always check for accurate spelling, grammar and punctuation errors, and ask someone to proofread your content before publication.
You should also ensure your content is accessible following the tips given throughout this guide, as well as by:
- avoiding the use of unnecessarily complex words and phrases
- providing a glossary for terms readers may not know
- expanding acronyms on first use. For example: call to action (CTA)
Additional resources:
- How to find a balance between SEO and content
- The evolution of SEO: what’s next for content?
- Seven ways blogging can be a great SEO solution
By following this content optimisation guidance, you’ll truly make content the king of your inbound marketing strategy.
Of course, this can be a time-consuming practice, but it is an essential part of ensuring that your content finds its rightful place at the top of SERPs. However, once you’ve optimised several pieces of content, it will become second nature!
Content optimisation is just one of the many content marketing services we offer here at Angelfish Marketing.
So, if you’re struggling for time or resources and are looking for a partner to help skyrocket your content’s success, contact our team today to book your free content review, report and consultation where we can discuss this in more detail...

About the Author: Katie Preedy
AuthorKatie is Angelfish Marketing's content writer.
Connect on LinkedIn